How To Add Signature In Outlook For Desktop, Mac And Web
Having a digital signature is as important as having a normal signature. It is something that is related to your identity. When you add signature in Outlook, it gives out the information about you.
It has details like the name, their designation, email ID, contact number and any other info. It can be quite a task if you don’t know the exact steps to add it. That is why we are here to help you out. No matter what device you use, we will help you to add a signature in Outlook.
Read Also, Why Outlook Send Receive Error
How to Add your Outlook email Signature on Desktop
Outlook is great when it comes to managing a number of email accounts in one place. It is also possible to add a signature in Outlook separately for the email accounts. You can do it by referring to the steps mentioned below:
- Open Outlook on your system and then navigate to ‘File’
- Select ‘Options’ from the left side of the screen
- Click on ‘Mail’ to get to your email settings
- You will see an option to ‘compose messages’ on the right side where you will see ‘Signature’. Click on it to open it
- You can click on ‘New’ to have a new signature in the app
- You will be asked to enter a name post which you can click on ‘Ok’
- Choose the signature from the list and you will be able to edit it right away
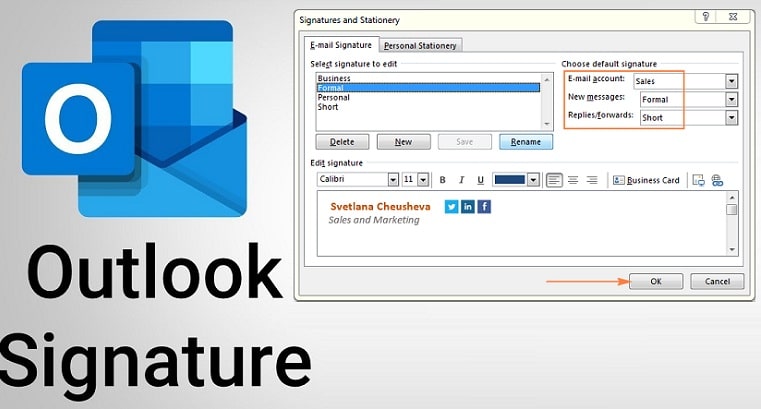
- You can type your sign in text only and then use the options that are available to customize it as per your preference. You will also have an option to insert an image
- Click on ‘Choose default signature’ and then click on the email account that you wish to use the new signature for. Pick your signature from the ‘New messages’ if you wish that each of your emails should have it.
- You can also pick a signature that you can use to reply to emails or when you forward something
- Click on the ‘Ok’ post create your signature
Read Also, How to Setup Yahoo Mail in Outlook
How to Add your Outlook email Signature on MAC
The options that you get in MAC are quite similar to Windows but the steps can differ. The exact steps are as follows:
- Go to the Launchpad from the dock, search for Outlook and then open it
- Select ‘Outlook’ from the top and then click on ‘Preferences’
- Click on ‘Signatures’ from the email section from where you will be able to manage the email signatures
- Click on (+) sign in the ‘Edit signature’ to add a new signature for Mac in Outlook
- It will open a new window right away and let you type and format the signature. You can style it as per your taste
- From the ‘Choose default signature’ option, you can state options like what email account to use the signature in. You can also see if you’d like to use it for your new emails and also if it should be a part of your replies and forwards.
Read Also, How to Remove Duplicate Emails in Outlook
How to Add your Outlook email Signature on Web
Outlook for the web doesn’t come with too many options so it is going to be less confusing to you. All you need to do is launch the app, click on the option, and done! For your convenience, the steps are:
- Go to Outlook for web and then login to your account
- Click on ‘settings’ and then click on ‘View all Outlook settings’
- When you see the screen, choose ‘Compose and reply’ from the available options
- Once you do it you will see a white box on the right side where you can add the signature
- Enter the signature and you can use the available tools to format it. Select apt options like when to add it to your emails and then click on ‘Save’ once you are done.
Read Also, How to Recall an Email in Outlook
Use your Signature in Outlook Easily
If you have not chosen to include your signature in all of your outgoing emails then you’re going to have to manually add it to each of your new emails. It’s quite easy to do so as the option is easily available on the new email window. The steps are:
- Click on Outlook and then go to ‘New email’ to create a new email
- Make sure that you are on the ‘Message’ tab. Click on ‘include’ and then select ‘signature’
- The sign that you generated before will be there in the list. Click on it and it will be directly added to the current email
- If you wish to use a different signature then you can click on ‘Signature’ to do so
Read Also, How to Print Email from Outlook
Change your Signature in Outlook
If there is something that you wish to change in the signature then you can do it too. The steps to make a change are:
- Click on ‘New email’, go to ‘Signature’ and then click on ‘Signatures’ in Outlook for Windows
- You can choose your signature and then edit it
- Outlook for MAC- Go to Outlook and then click on Preferences then go to ‘signature‘. Click on edit and then make the changes.
- Outlook for the web- Go to the settings and then click on ‘View all Outlook settings’. Click on ‘Compose and reply’ and then you can edit your signature
Also Read, How to Open Outlook in Safe Mode
You will be able to add a signature in Outlook easily by using these simple steps. If you want more assistance then don’t hesitate to connect with Email support and the experts will guide you.