
How to do Mail Merge in Outlook to Send Personalized Emails?
Before we step ahead and mention the procedure of performing Mail Merge in Outlook, let’s learn a bit about this feature first. Mail merge in Outlook allows you to send personalized emails to a large number of recipients without letting them know that the mail is sent to some other person too or who else it is sent to. This kind of feature is useful when you have to promote a particular product or service and when you want it to look personalized.
Mail merge can be performed in various ways and you can use many tools to add more features to this function.
In this blog, we will mention how you can mail merge in Outlook effectively as well as simply. We hope you find this guide helpful and don’t face any issues with the steps. However, if you need any sort of help regarding the matter you can always contact our Email Support experts for help.
Steps to do a Mail Merge in Outlook
Performing a Mail merge in Outlook from the email program itself is really easy as long as all the recipients to whom you want to send emails are added in your Outlook Contacts. Before you get started we suggest you verify if there’s any limit to sending emails in Outlook at a time or in a day. To confirm this, you can contact your ISP or mail admin. However, you should not face any issue with sending up to 100 emails at a time or even in a day. If there’s a limit for sending emails and you want to send your mails to a much larger group, then you can utilize the Mail Merge tool to work around these limits.
Follow the steps to know how to do a Mail Merge in Outlook.
Step 1: Select Your Recipients
- First of all, go to the Contact folder where you have saved all your contacts. Alternatively, you can also press the Ctrl+3 keys to get to your Contact folders quickly.
- Now, select the contacts to whom you want to send a mail merge or simply apply a filter based on a category to select certain contacts. To apply a filter in the contacts folder, use the below methods:
- If you want to send this mail merge to people assigned in a certain category like your Company etc. you can simply search your company name and all the contacts with this category will show up.
- To arrange your contacts in categories, go to View and then select Change View to set it up in List or Phone view. Next in View, select Arrange By option and then click on Categories. If you are using Classic Ribbon, go to View, choose option group: Arrangement, and then select Categories.
Step 2: Open Mail Merge in Outlook
- Now to open Mail Merge in Outlook, do the following depending on your ribbon type:
- If you are using Simplified Ribbon (Microsoft 365), go to Home and click on the ellipsis (three-dot) icon. Now, select the Mail Merge option.
- For Classic Ribbon, go to Home and select the option group: Actions and then click on Mail Merge.
- Now to select the contacts that you filtered before, click on All Contacts In Current View or the Only Selected Contacts option.
- Apply the following settings to your Merge Mail.
- Set document type as Form Letter, select E-mail in Merge to option and then enter the subject of your email in the Message Subject line. *Note that you can also modify the email subject later on also.
- Click Ok to apply your settings and wait as the MS Word opens.
Step 3: Create the Message in Word Document
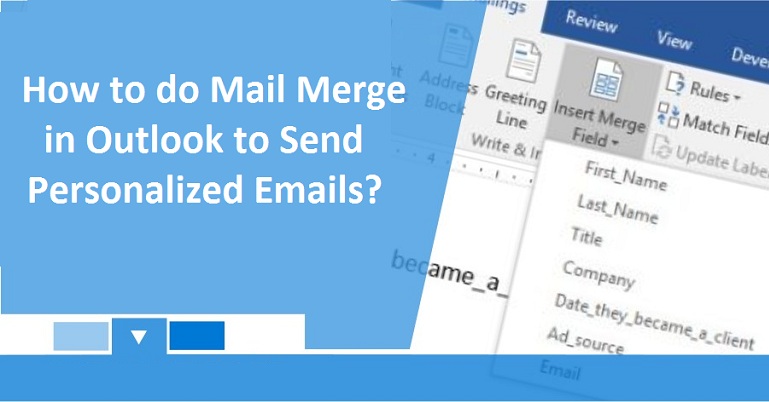
- In the New document, go to the Mailings tab from the Ribbon.
- It’s time to write the email body with variables. You can do so, by following the steps below:
- Click on the Greeting Line option and then insert your Greeting.
- Now select different Greetings for different contacts and which Greetings should be used when there’s no information available of the contact.
- It’s your personalized Mail Merge, so you can use any sort of Greeting, write Dear or Hello or Hi, whatever you like. Also, you need to enter a space after your Greeting (Dear or Hello) so that it wouldn’t stick to the recipient’s name.
- Now click on Ok to apply your settings and close the Greetings Line dialog. Hit Enter and start with a new line in the document.
- Enter your message that you want to convey to the recipients and again hit Enter.
- Click on Address Block to insert the address of the person. Also, disable the “Insert Recipient’s name in this format” option as we’ve already addressed the recipient. Moreover, you need to disable the “Insert company name” option too as we are only addressing individuals in this email.
- Now click on OK and start with a new line by pressing ENTER.
- Select the “Insert Merge Field” option to insert the phone number of the recipient. From the dialog box, select the Home_Phone option and click on Insert.
- Close the dialog box by selecting OK and then hit ENTER to start with the next line in the document.
- Enter your closing line like “Thank you for your time” or “Best Regards” with your name.
Step 4: Preview and Send the Email
- Now that the message body is ready, you can send it to your recipients. To check the preview of your email, click on the Preview Results option.
- If you want to make any changes in the email, do it now otherwise click on Finish & Merge option to send it.
- Choose the Send Email Messages option and when the Merge to E-mail dialog opens, you can edit the subject or make any changes to your selected contacts. If you don’t want to make any changes, just click OK and finish the procedure.
How to Use Mail Merge in Outlook Directly From MS Word?
You can also use the Mail Merge feature of Outlook directly from MS word document. Either way, the end result is going to be the same but the options are going to be a bit different. To know how to start Mail Merge from Word and send the email through Outlook, follow the steps below:
Note that we are skipping the letter-writing example here as it is the same for both. You can refer to the previous section to know how to write the email body with variables.
Step 1: Start Mail Merge in Word
- Go to the Mailings tab and select the Start Mail Merge option.
- Now click on the Step by Step Mail Merge Wizard to get started.
- On the right side of the page, you will see a Mail Merge task panel, from where you need to select the E-mail messages option as your document type.
- Click Next. Here, you will be asked to select your document that you want to email. Because we are going to write the email body, you just need to select Next.
Step 2: Add Contacts for Your Mail Merge
- At this step, you need to select your email source which is Outlook. So click on the “Select from Outlook Contacts” option.
- Click the “Choose Contact Folder” option and select the contacts folder that contains the recipients to whom you want to send this mail. You might have to wait a bit until this dialog box shows up.
- Now that you have selected the Contacts folder, you will be taken to the “Choose Profile” dialog. You can select the option of your choice or use the default option whatever you prefer. Click Ok to apply your settings.
-
As the Mail Merge Recipients dialog opens, you can select the contacts to which you want to send this email. You can apply various filters to categorize and select your contacts however it can take some time as the dialog is a bit slow especially when you have a lot of contacts in the folder. If you want to send this email to all the contacts in the folder, you can simply use the Find duplicates filter to avoid sending the mail twice to a contact.
Step 3: Create the Content for Your Email
- Once, you have selected the recipients, you are now ready to write the message for your email. You can create the content for your email using the same way as mentioned earlier.
- Once your content is ready, you can preview the emails before sending them.
- Select the Electronic Mail option and fill up some required details including To: Email Address and Subject Line.
- Click Ok to start sending the emails.
Final Touch
We know that was a bit overwhelming but you’ll get used to all the functions of Mail Merge In Outlook once you’ll start using it. Besides, you are not alone and get help from our skilled Email Support experts anytime if you face any issue.