How to Recall an Email in Outlook Desktop Client and Web
As human beings, we have an innate tendency to make mistakes. The same goes with writing an email. Everyone must have gone through the experience of accidentally sending in an email in Outlook and then panicking afterward. At such points, you might wonder if there’s an option to take the sent email back. Well, if only you knew how to recall an email in Outlook. The recalling features make the email you sent get deleted and be replaced with another correct one. Essentially, you navigate to the ‘Sent Items’ and tap the ‘Recall this message’ option.
Apart from recalling, there are also other ways to make up for the erroneous message you sent. In this article, we’ll explore the email recalling feature in detail and some alternatives to it.
Read Also – How to repair PST files in Outlook
How to Recall an Email in Outlook Desktop Client
If you work on an Outlook desktop client and your recipient uses Office 365 or a Microsoft Exchange account, you can use these simple steps to recall an email. Note that this feature will not function for emails that aren’t in the same company. So your recipient needs to be using Exchange in the same organization.
- Navigate to the ‘Send Items‘ folder and look for the message you want to un-send. It’s often at the starting of the messages at the sent list. You must double-tap it.
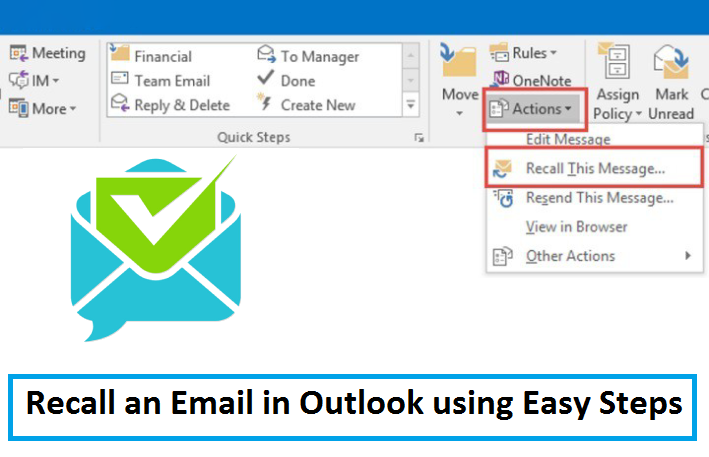
- Next, hit the ‘Message‘ button present on the top toolbar. After it expands, locate the ‘Move‘ section. There you will notice the icon of a letter and an envelope, which will help you see more options. Tap that icon.
- After ‘More options‘ displays, click ‘Recall This Message.’
- You will find a pop-up window coming up. There will be two options in this window. The first will be to ‘Delete unread copies and replace with a new message‘, and the second will be to ‘Delete unread copies of this message.’
- You must go with the option that alerts you if the process to un-send an email was successful or not.
- If you prefer to send a replacement email, another screen will open in Outlook where you can analyze the message. When you write the new email, Outlook will un-send the old message.
- Tap the ‘Sent’ button after reviewing the message.
Read Also – How To Fix Outlook Send Receive Error
What are the Conditions in Which Recalling Message Works?
Now you know how to recall an email in Outlook Desktop client. But the recalling feature may not always prove to be successful. It’s because it only works when your message is still unread. Today, with the various mediums through which people can access emails, you cannot always expect that your email will be left unread.
For the recalling feature to work, your email should satisfy the following:
- As mentioned before, the organization must use Microsoft Exchange as the email server.
- You must have sent the email message to one or more people within your organization.
- Your recipient should use Microsoft Outlook and sign in to the server.
- The email shouldn’t have been moved away to another place in the inbox.
- Your recipient shouldn’t have read the email.
How Recall Email in Outlook Web?
If you are using web access to your email account, you can use the ‘Undo Send‘ option. But this option is only available for a maximum of 10 seconds after you choose the Send button. Follow these steps to enable the Undo option.
- Tap the cog icon present on the top-right part of the web window.
- Now, you’ll come to the ‘Settings.’
- Here, select ‘View all Outlook settings.’
- Ensure that the option of ‘Email‘ on the left is selected.
- Now, navigate to ‘Compose and Reply.’
- Go down to the ‘Undo Send‘ option. Here, adjust the slider to show for how long you wish to be able to recall an email.
- To apply the changes, tap ‘Save.’
Now, anytime you send an email in the future, you will see an ‘Undo‘ option next to the bar at the screen’s bottom. It will display ‘Sending.’ Tap on it to recall the message.
Read Also – How To Add Signature In Outlook
How to Delay the Delivery of Your Email in Outlook
Often, it so happens that you remember to add detail to your email or do not a carbon copy the right people to send the message later on. To prevent it from happening, you can leverage the feature of delaying or scheduling the delivery of a specific message. You can schedule the delivery of messages by following these steps.
- When creating a message, choose the ‘More Options‘ arrow. It is present in the ‘Tags‘ group.
- Below the ‘Delivery Options,’ choose the checkbox, ‘Do not deliver before.’
- Next, hit the delivery rate and time you prefer. Now click ‘Close.’
- After you compose your message, choose ‘Send.’
- The message will stay in your outbox till the delivery time approaches. But if you find later on that you need to send the email urgently, take the following steps.
- Navigate to the outbox folder and open that message.
- Now opt for the ‘More‘ options arrow like you did before.
- Below ‘Delivery Options, ‘ clear the checkbox ‘Do not deliver before.’
- Lastly, tap ‘Close‘ and click ‘Send.’
The Steps to Delay the Delivery of all Emails
Do you know that you can also delay the delivery of every message by two hours? You can do that by creating a rule. To know how to delay the delivery of all messages, follow these points.
- Tap ‘File‘ followed by ‘Manage Rules & Alerts.’
- Now, tap ‘New Rule.’
- Choose the ‘Select a template‘ box. Now, tap ‘Apply rule on messages I send‘ under ‘Start from a Blank Rule.’ Tap‘ Next.’
- In the ‘Select Condition(s)‘ list, choose checkboxes for the options you want and tap ‘Next.’
- In the ‘Select Action(s)‘ list, choose ‘Defer delivery by a number of minutes.’
- In the box of ‘Edit the rule description (click an underlined value),’ tap the underlined phrase, ‘a number of.’
- Now, input the minutes for which you wish the email to be held before being sent. Note that you can only delay delivery by up to 120 minutes.
- Tap ‘OK‘ followed by ‘Next.’
- Choose the checkboxes for any exceptions you wish.
- Tap ‘Next.’
- In the box of ‘Specify a name for this rule,’ input a name.
- Choose the ‘Turn on this rule‘ checkbox.
- Lastly, tap ‘Finish.’
Read Also – Why Outlook Search Not Working
Final Thoughts
By understanding how to recall an email in Outlook, you can potentially save yourself from sending erroneous emails. Follow the steps to un-send an email in the Outlook Desktop client and web. You can also delay the delivery of messages so you can add more details to them. If you need additional support to follow the process, feel free to contact email technical support services. The experts will guide you thoroughly on every stage of the procedure.