How to Share a Folder in Outlook? The Exact Steps to Follow
Users can share a folder in Outlook if they need to give access to their inbox to another person. When you share a folder with another person, you must grant them permission to see your entire inbox. But if you don’t want to share your inbox, you can make a public folder in your Outlook account. You can share that with the person. To be able to grant access, you should know how to share a folder in Outlook. In this article, you’ll learn about sharing a folder in the Outlook web app and Desktop app. Not only that, but you’ll also understand how to remove a shared folder.
Read Also, Why: outlook won’t open
How to Share a Folder in Outlook?
As mentioned above, you can share Outlook folder from the web app and the desktop app of Outlook. In the subsequent sections, you’ll find stepwise instructions relating to both these methods.
Share a Folder in the Microsoft Outlook Web App
To begin sharing a folder through the Outlook web app, start by signing in to Outlook on the web. Head over to the Outlook URL given by your organization to log in to your account. Now, follow the steps below.
- Right-tap on your email account name. Then, tap ‘Permissions.’ it is important to share the whole email folder. If you don’t desire to permit a person to view your whole email account, make a public folder and shift messages to it manually.
- Next, click the ‘+’ icon. It is above the user list at the top left part. You’ll notice a user search window on your screen.
- Now choose the person with whom you want to share the folder and tap ‘Add.’ To locate the person, just type the first two letters of their name in the search bar.
- Now choose the person’s name and then opt for a specific permission level. The permission level determines the access of that person to your email account.
-
- Check that you permit that person to view your account. Otherwise, they cannot access the folder. So, select the ‘Reviewer’ permission level. It will grant view permissions only.
- To not permit the person to view your account, choose ‘None.’ But with this option, you’ll not be able to share any folders with that specific person.
- Now tick the box beside ‘Folder Visible.’ Then tap ‘OK.’ You’ll notice a checkbox at the bottom-right part. You have granted the person permission to view your email account. So, now you can share the needed subfolder with them.
- Note that if you share your mailbox, it means you are sharing only your inbox. You are not sharing the folders within the inbox. You need to share subfolders individually.
- Right-tap the subfolder you wish to share. After that, click ‘Permissions.’ A permissions window will open.
- Now add the person and select their permissions. The process is exactly the same as sharing the mailbox.
- There’s no need for the permissions to be the same as those you grant to the whole inbox.
- In some instances, you may desire the person to make, read, change, and delete items. In this case, you must select ‘Publishing Editor.’ ‘Editor’ permissions consist of the same permissions as the publishing editor. However, the user cannot create subfolders.
- Tick mark the box beside ‘Folder Visible.’ Then tap ‘OK.’ You have shared the selected subfolder.
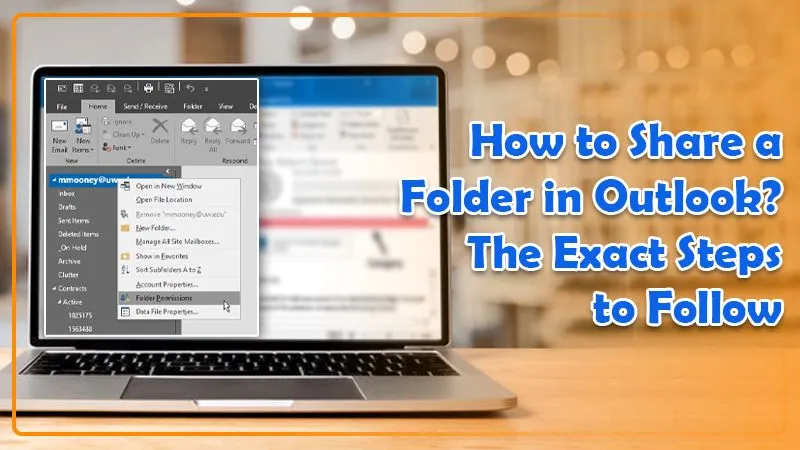
Share a Folder in the Microsoft Outlook Desktop App
Those using the desktop application should be familiar with the process of sharing a folder in Outlook desktop app. Follow these points to know about it.
- Firstly, tap the ‘Email’ icon in the application. The icon is of an envelope and is present at the end part of the navigation pane.
- Now you’ll notice a set of folders appearing in the left panel.
- Right-tap the account name and choose ‘Folder Permissions.’
- Tap ‘Add User.’ A search window will launch where you can look for people to add.
- Now find the user you want to share Outlook folder. You must ensure that you’ve chosen the right address book from the ‘Address Book’ menu.
- Now choose the name of the person and hit ‘Add.’ It will add that person to the list. It is totally possible for you to add several people. Search and add all those users whom you wish to share the folder with.
- Tap ‘OK.’ The user whom you’ve added will now come in the set of names at the top part of the window.
- Now choose the person’s name as well as the permission level. To give permission to several people, hold the ‘Control’ and ‘Shift’ key down when you click every user you are adding.
-
- You must give the permission to read if you want a person to access a subfolder.
- If you want a user to just view your inbox but not modify anything, choose ‘Full Details.’ Then choose ‘None’ below ‘Delete Items’ and remove all the checkmarks you see.
- Tick the box beside ‘Folder Visible’ and tap ‘OK.’ Now, the users can locate your shared mailbox. You can now share any subfolders.
- Right-tap the subfolder you desire to share. Then tap ‘Folder Permissions.’
- Add the user and select their permissions. Choose a specific permission level like you did when you shared the mailbox.
- Tick the box beside ‘Folder Visible’ and hit ‘OK.’
- Now the user you’re sharing with can view and access your folder.
Read Also, Why – outlook stuck on loading profile
How to Remove a Shared Folder?
The process of removing a shared folder and sharing a folder is the same. If your colleague has shared a folder with you, the simplest way you can get rid of it is to ask them to revoke every permission. Follow the steps below to remove a person from seeing your shared folder.
- Right-tap the shared folder and choose ‘Properties.’
- Choose the ‘Folder Sharing’ tab.
- Select the user whom you don’t wish to share the folder, and then choose ‘Remove.’
Read Also, How to Fix Issue of: outlook not receiving emails
Final Words
Sharing a folder is quite useful when you want to give someone access to your account when away from the office. So, you must know how to share a folder in Outlook correctly. It will allow the necessary people to view the folder and carry on with their needed tasks. Contact professional Outlook customer support services if you want more assistance with the whole process. They will resolve any doubts you may get while following the instructions.